

Gingerbread Houses
Some years back I started a tradition with my niece, nephew, and oldest daughter decorating gingerbread houses. I bought $5 kits and we each had our own. The next year I couldn't find any that price they were all at least $10 so I decided to figure out what we could do to have the fun without paying an arm and a leg.
My dad is handy so I had him build some houses based on graham cracker dimensions. He purchased enough plywood for 4 houses (1 for each grandkid - by then I had another child) and began building. They are very sturdy and so are the bases, unlike those plastic ones the kits come with. You could also use milk cartons or boxes glued down to a heavy cardboard base.
I purchased cheap gum drops, fruit slices, candy canes, hard candies, etc and we use those to decorate with. Any leftovers hit the freezer til the next year. Many times you can find sales of Christmas colored goodies after Christmas. You can also buy those cute little realistic trees that they use for those Victorian villages.
 Here is the house and base before I get started.
I purchased cheap gum drops, fruit slices, candy canes, hard candies, etc and we use those to decorate with. Any leftovers hit the freezer til the next year. Many times you can find sales of Christmas colored goodies after Christmas. You can also buy those cute little realistic trees that they use for those Victorian villages.


I cover them with freezer paper. I put the shiny side out so the frosting doesn't leech into the paper.

Royal icing (makes about 6 cups)
6 tablespoons Meringue Powder
2 pounds powdered sugar
3/4 cup warm water (don't add all at first)
Beat all ingredients until icing forms peaks (7-10 minutes on medium.) You want your frosting thick but not so thick the kiddos can't squeeze it through a piping bag. Use disposable decorating bags, add the frosting and then use a rubberband to keep it closed. It will prevent the frosting from getting squeezed out the wrong end and getting all over the place.
With a frosting spatula or flat knife spread some frosting glue onto the roof and sides and attach graham crackers. You will need to cut some of your graham crackers for the ends that are angled. Used a serrated knife like you would a saw.

Start decorating!!


~~~~~~~~~~~~~~~~~~~~~~~~~
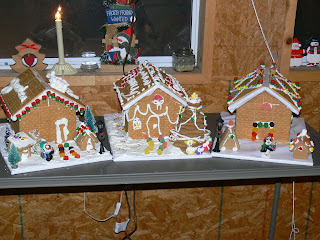
Here are a few other years we made them.
2006

2009

2010

2011


2011

2012

ok, you win the gingerbread house smart award.... A WOOD BASE... genius!!!! I bet its so sturdy!!! Thanks so much for being a part of my crafty Christmas today!! its a great post! Emily
ReplyDeleteVery sturdy and since we usually decorate them at Grandma's house they travel well! Thank you for having me on your roundup!
DeleteLove your gingerbread houses! Using a wood base is a great idea! I'll have to try that next year. Happy Holidays!
ReplyDeleteThank you! It is a lot of fun to make!
DeleteWell, that solves the problem of the graham crackers falling apart, doesn't it? Nice work. Linda
ReplyDeletehttp://www.craftsalamode.com/2013/12/what-to-do-weekends-51.html
Thank you Linda. I stopped by your party!
DeleteOh my goodness how much fun! I love that you used a wood base this is genius!
ReplyDeleteThanks! It cost a chunk the first year but we have saved money since then for sure. I love the bases for their sturdiness too!
DeleteThese houses are adorable. I imagine them in a christmas cake.
ReplyDeleteMerry Chrsitmas !
Cecilia
Oh yes, very pretty as a cake Ana!
DeleteThose are adorable! So clean and neat :) My son came home from school with one yesterday. NOT as pretty as yours :)
ReplyDeleteLook back at previous years when I let them have at it when they were younger. Very messy!
DeleteSo fun to see the kids growing up with their houses!
ReplyDeleteIt is! My youngest was 10 months old when we started this.
DeleteIt's been a great tradition. My nephew has since outgrown them and I think soon my niece too. I will carry it on with my daughter and after that I will do them! :D
ReplyDeleteThe houses are so beautiful. I love how creative the kids are and the photos will be wonderful memories for them to share with their children.
ReplyDeleteWe have a load of fun Joanne!
Deletevery cute and practical too, Jenny thanks for sharing your tips with us at Foodie Friends Friday!!
ReplyDeleteThank you Cindy!! Thanks too for stopping by!
Delete